
Hey guys, Krista here! I get questions all the time about how to modify a Bronco, or what can be done to upgrade a lower-level trim that didn’t come with all the bells and whistles of the more expensive versions.
Today, I’m here to help you think outside the box when it comes to modifications, such as pod lighting or ditch lighting. These upgrades can give your Bronco a custom look and improved functionality without breaking the bank.
Let's first touch on what pod lighting is, and where it would go in a typical application. Usually, you would see pod lighting next to the driver side and passenger side mirrors. This is a common location because ALL full-size Broncos come equipped with mounting points for pod lighting here! While this is a great location, we're not truly exercising our creativity when we talk about mounting lighting


Another popular location is mounting pod lighting onto your vehicle's front bumper. Now, this is where it starts to get interesting... We all know that Ford has graced us with multiple bumper options. One of those options is the "Modular" bumper, which comes with predrilled mounting locations for aftermarket accessories such as fog lighting, pod lighting, bull bars, and more. But for some of us, our vehicle is equipped with a different bumper—the "Capable" bumper. While this bumper does have factory provisions for fog lighting, there are no other locations to mount aftermarket accessories. BUMMER! Don't worry, not all hope is lost.

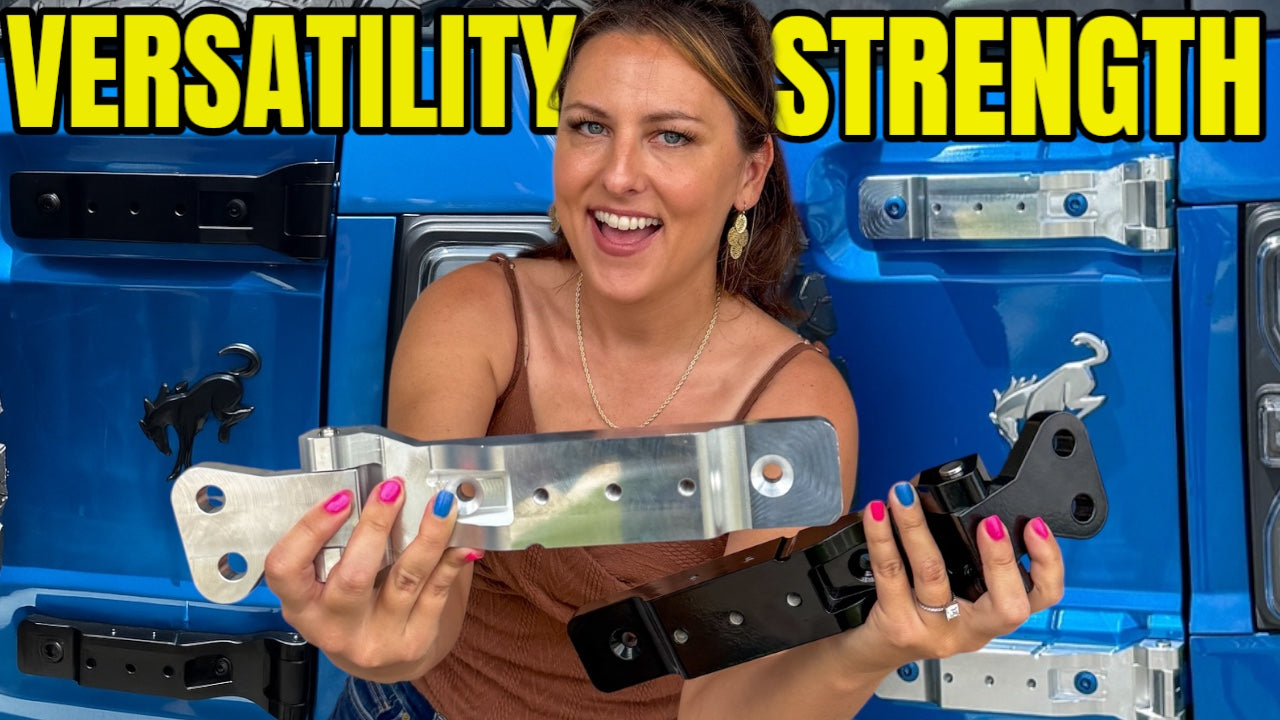
Recently we upgraded our Velocity Blue 2 door Bronco with the Buckle Up Off-Road Winch Mount Bundle with Borne Off-Road 10K lb Winch.
While we LOVE the added look and functionality we gained by installing this combo, we were also rewarded with an unexpected upgrade. We now had several different mounting options for aftermarket accessories! That's where our "out of the box" journey truly begins.


We started with the Diode Dynamics Stage Series SS3 Backlit Ditch Light Kit for 2021+ Ford Bronco | Yellow Sport | dioDD7185. After opening the box, we discovered that all of provided brackets and hardware will work for mounting and wiring our kit! To briefly touch on the subject of wiring, our vehicle is NOT equipped with OEM up-fitter switches. This means we needed another way to activate the pod lighting... Luckily the Diode Dynamics kit came with a provided switch that activates not only the backlighting, but the pod lighting as well! We will get more in depth on that topic later on....
To mount our Diode Dynamics brackets, we did need to open up the slotted hole with a Dremel in order to accommodate the larger mounting bracket hardware attaching the winch mount to the bumper horn.


The next step was as easy as locating all of the pod lighting attachment hardware and positioning the lens as desired. The fun part about this step is you get to play around with customizing your lighting angle.


Now for the fun part... WIRING! Everybody's favorite, am I right?!? Truthfully it's not bad at all. Like I had mentioned earlier, Diode Dynamics provides you with a full harness, relay, fuse link, and switch option right out of the box. The only decision you have to make is, are you going to use the provided switch or the OEM up-fitter switches (if applicable). If you decide to use the factory up-fitters, Diode also provides a pre-terminated lead to use instead of the 3 way switch. If you use the up-fitter switches, you'll need to match the OEM up-fitter wire colors to the yellow (backlight) and blue (fog light) output wires. Because these are simply an activation wire (low amp draw) for the provided relay (direct battery connection), we recommend wiring these to switch 5 & 6.


Since our vehicle is NOT equipped with OEM up-fitters, we will focus on the 3 way switch for the rest of our installation. We began by mounting the provided relay to the battery tie down. Unfortunately, the mounting hole did need to be drilled a few sizes larger in order to properly fit over the stud. Due to this very specific mounting solution, I did end up using a 13mm nut that was NOT included in the Diode Dynamics kit.


Once our relay had been properly and securely mounted, we moved on to the pod lighting connectors. We were able to lop the harness around and down near the driver side headlight, along side our already installed winch wiring. Another plus for the Buckle Up Off-Road Winch Mount, is zip tie provisions for easy wire management! All of our excess wiring was tied up nicely and tucked in the engine bay, underneath our driver side headlight.


Moving on to our interior switch, we needed an easy way to get our harness through the firewall and into the cabin of the vehicle. Luckily there is a very convenient rubber grommet located next to the brake booster on the drivers side. This rubber grommet can be easily removed from inside the vehicle. Once the grommet is removed, we made a small incision in the rubber both up & down and left to right. This method helps the large connector pass through while still sealing tightly against the harness once complete.


For our switch location, I wanted something discreet. I found a small spot just above the hood lever that looked promising. This lower kick panel is held on with a series of push clips that can easily be dislodged by evenly pulling on the panel. Once I removed the panel, I was assured that there was enough room behind to mount the switch. At this point I drilled a centering hole, then used a stepper bit to enlarge the hole little by little until the switch could fit snugly. Pro-tip: The switch has a locator tab that runs up one side. This is there to keep the switch from spinning in place once clipped in. Because we were able to make the hole exactly the right size, the pressure keeps the switch from rotating around once installed. To remove this tab, we simply used a razor blade to slice the tab off.


We're getting close now! With the switch in place and our harness ran and secured. It was finally time to hook the power and ground to the battery. More specifically, we ran our fused power wire directly to the battery then attached our ground lead to a proper ground close to the battery.


IT WORKED!!! We have pod lighting! Even better, both our backlighting and fog lighting work. When you flip the switch to the "1" position, the backlighting is illuminated.... Then flip the switch to the "2" position, and we have the BRIGHT fog light capability.


Working on this Bronco lighting project has been such a fun and rewarding experience. Taking the time to carefully select the right lights, figuring out unique mounting solutions, and seeing everything come together has been incredibly satisfying. There’s something special about transforming your vehicle into something that reflects your personality and meets your specific needs. Each modification tells a story, and the sense of accomplishment when you flip that switch and see your new lights in action is unmatched. Seeing your vision come to life and customizing your vehicle to fit your style is what it's all about. Don’t be afraid to get creative and try something new—you might be surprised by the results.
Don't forget, for all of your 6gen Bronco needs be sure to shop at www.Buckleupoffroad.com!